
Your website visitors want instant answers. Not a contact form, not a 24-hour email response, not a FAQ page they have to dig through—a direct, conversational answer to their exact question, right now.
And honestly? They’ve gotten used to it. Chat interfaces are everywhere, and if your website doesn’t offer one, you risk looking outdated. In fact, recent research shows that 62% of consumers now prefer using chatbots instead of waiting for a human agent.
A well-placed AI chatbot widget does more than just answer questions—it directly impacts your bottom line. Studies have shown that when a chatbot is tightly integrated with your content (answering product questions and reducing purchase hesitation), it can more than double the purchase conversion rate. On the support side, it can cut initial response times from hours to mere seconds, while reducing overall support costs by roughly 30%.
Whether it sits on your main marketing website, inside your app, or on your documentation pages—an AI chatbot makes your business feel responsive, alive, and fiercely competitive.
The problem is that building one from scratch is a serious engineering challenge. And the ready-made alternatives? Often absurdly expensive.
Let’s fix both.
Why building your own AI chatbot widget is harder than it looks
When most people think “I’ll just add a chatbot to my website,” they underestimate what that actually takes. A real AI chatbot that answers based on your content (not generic internet knowledge) requires three distinct layers:
-
The AI and knowledge retrieval logic (RAG). You need a system that ingests your documents—PDFs, URLs, product docs—chunks them intelligently, stores them in a vector database, and retrieves only the most relevant pieces to feed to a language model. Building this from scratch involves 8 major engineering challenges that are often underestimated: supporting diverse file formats, data cleanup, optimal chunking and embedding, metadata tagging, source quoting, retrieval quality with re-ranking, complex query decomposition, and retrieval latency optimization.
-
The widget itself. A clean, customizable chat interface that loads fast, looks good on any device, supports conversations, and integrates smoothly into your existing site—without breaking your layout or slowing your page.
-
The hosting and infrastructure. Someone has to run the servers, handle traffic spikes when your site goes viral, manage uptime, and keep the API secure. That’s not trivial.
Unless RAG is your core business and you have dedicated AI engineers, a managed platform is significantly safer and cheaper.
The expensive alternative: native docs AI tools
If you host your documentation on a platform like Mintlify, you already have access to a native AI assistant baked into your docs. Sounds convenient—but it comes with some serious downsides.
Price
Mintlify’s AI assistant can cost up to $0.50 per message. These are public visitors, meaning you have zero control over who’s asking questions or how many they ask. And their pricing model forces you to commit to a fixed tier of messages—you’ll pay for that tier even if you don’t use all the credits. For high-traffic documentation sites, the bill can easily climb over €1,000/month.
Locked-in knowledge
Mintlify’s AI only answers based on the pages within your docs. You can’t add an extra PDF, a blog article that isn’t part of your docs, or internal knowledge like sales decks or onboarding guides. Your chatbot’s intelligence is limited to whatever Mintlify is hosting.
No portability
That AI widget only lives on your Mintlify docs. You cannot embed it on your main marketing website, in your app, or anywhere else. It’s a single-context, single-platform tool.
Compare that to Lookio: a pay-as-you-go model where credits never expire, with queries starting at roughly 2 cents—that’s up to 25x cheaper than Mintlify’s native AI. And your widget can go anywhere.
The smarter approach: deploy a Lookio-powered widget in minutes
Here’s the full process. It takes about 5 minutes from start to a live chatbot on your website.
Step 1: Upload your knowledge base
Head to lookio.app and create a free account. You get 100 free credits to start.
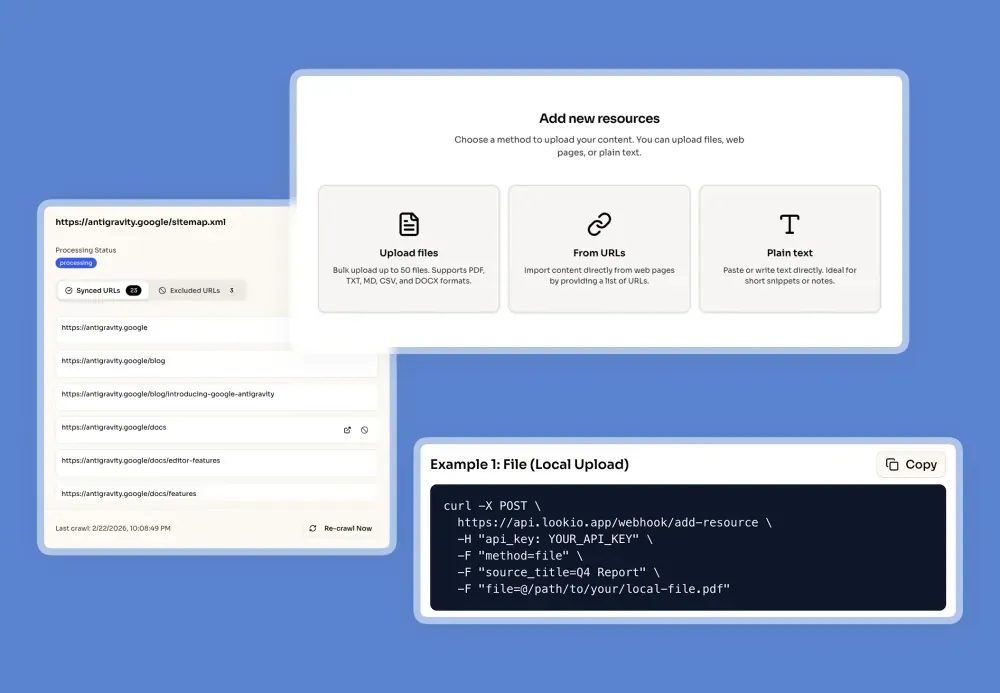
Go to the Resources page and import your knowledge. You have four options:
- Files: Upload PDFs, DOCX, TXT, or Markdown files directly.
- URLs: Paste individual page URLs, and Lookio will crawl and extract the content.
- Text: Copy and paste any raw text content.
- Sitemaps: Sync an entire XML sitemap (e.g.,
yoursite.com/sitemap.xml). This is the most powerful option—Lookio will automatically crawl all pages in your sitemap and keep them synchronized. You can even use Exclusion RegEx to precisely control what’s indexed at scale—for example, only including your/blog/pages or excluding pages that don’t match/en/to avoid processing multiple language versions of your docs. Don’t know regular expressions? We’ve built an AI helper that writes them for you based on your simple instructions. Whenever you add, update, or remove a page, the knowledge base updates itself.
Pro tip: Sitemaps are a game-changer for documentation sites. If your docs are on Mintlify, GitBook, or any other platform that generates sitemaps, you can sync the entire thing in one click and never worry about stale knowledge.
Step 2: Create your assistant
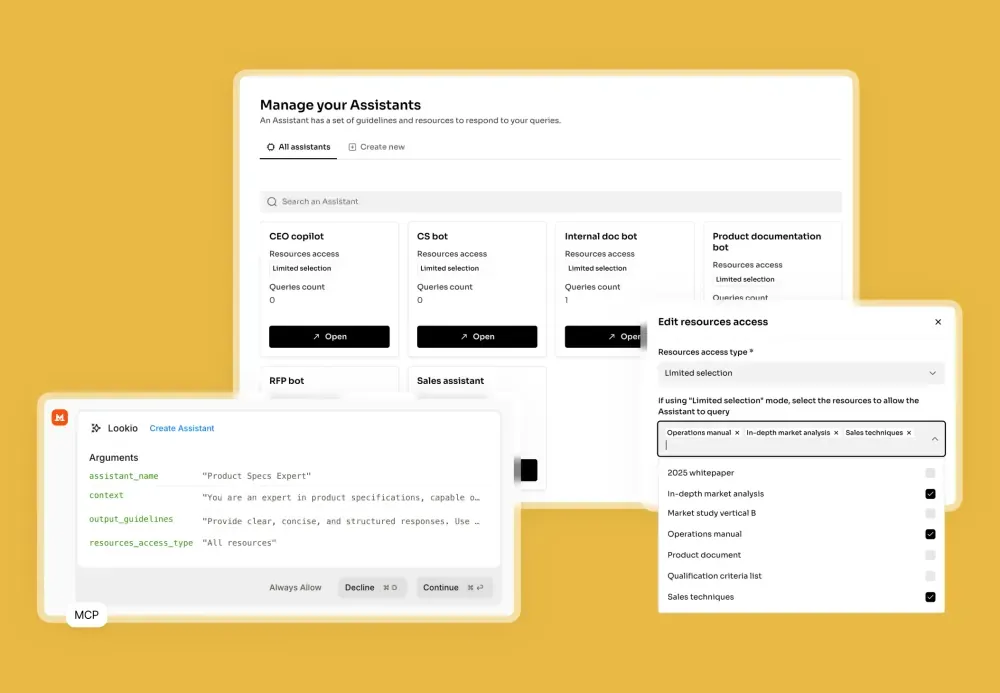
Navigate to the Assistants page and create a new assistant. You’ll configure three things:
- Context: This is your assistant’s personality and rules. Describe what it should do, what tone to use, and any constraints. For example:
“You are a friendly and helpful AI assistant for [Company Name]. Answer questions using only the provided documentation. Be concise and include links to relevant pages when available.”
Here’s where you can also fine-tune behaviors that persist across every conversation. For instance, you could instruct the assistant to always recommend booking a call with your sales team when a visitor shows strong interest in a specific product—and provide the scheduling link so the assistant can share it proactively.
-
Output guidelines: Set the response language, format, and tone. You might want answers in bullet points, short paragraphs, or a specific language.
-
Resource access: Select which resources this assistant can query. You can give it access to everything, or limit it to specific documents for a more focused experience.
Step 3: Set up and customize your widget
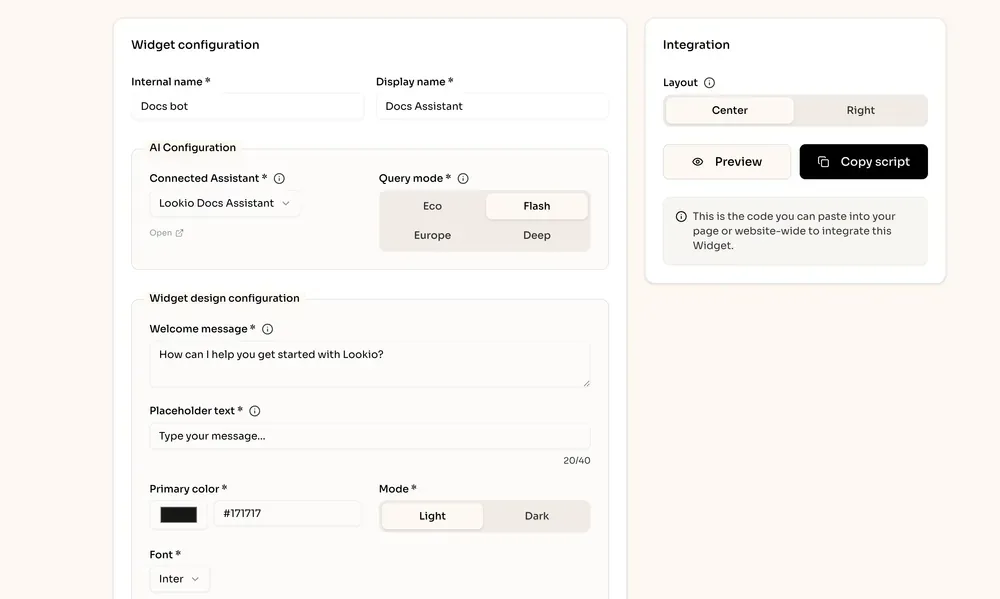
This is where it gets fun. Head to the Widgets section and create a new widget. Here’s what you’ll configure:
- Connected assistant: Pick the assistant you just created.
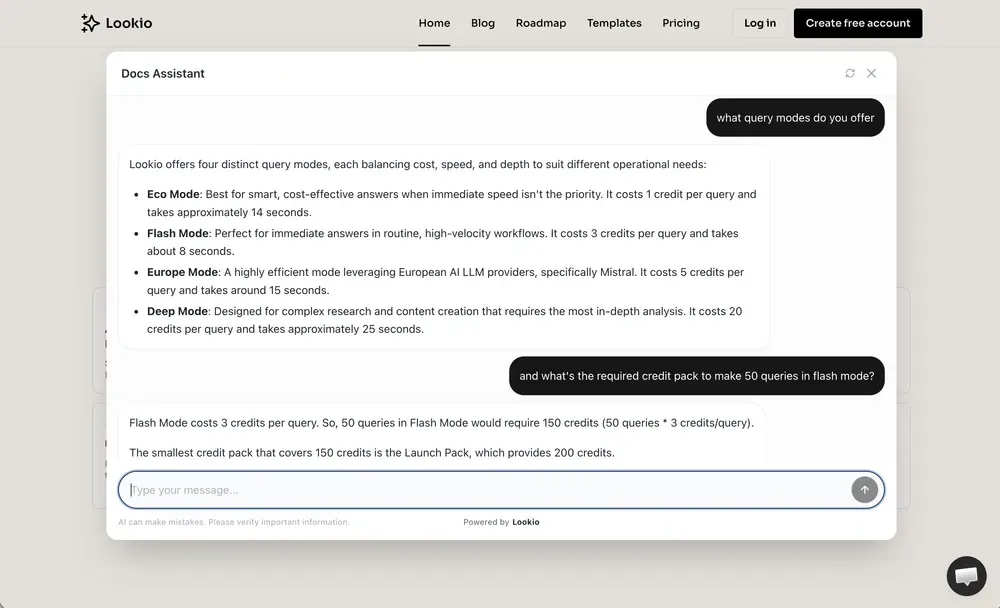
- Query mode: For a chatbot, we recommend Flash mode (3 credits, ~6s response). It’s fast enough for a real-time conversation and smart enough to deliver quality answers.
- Welcome message: The first thing visitors see when they open the chat (e.g., “Hi 👋 I’m here to help you find answers. What are you looking for?”).
- Placeholder text: The hint text in the input field (e.g., “Ask a question about our product…”).
- Accent color: Match your chatbot to your brand.
- Theme: Choose between light and dark mode.
- Font: Set a font that fits your website’s design system.
- Allowed domains: Restrict which domains can load the widget, so nobody can install it on their own site.
Two beautiful layouts to choose from
Lookio offers two professionally designed layouts, each with polished animations:
-
Centered layout: A subtle pill appears at the bottom center of your page. Click it and it expands with a clean animation, letting visitors type their question right there. Once they send a message, a centered modal opens with the full conversation view. It’s elegant and non-intrusive.
-
Bottom-right layout: A classic chatbot bubble sits at the bottom right. One click opens a full-height side panel on the right side of the screen with the conversation thread. This is the layout most visitors have come to expect from live chat tools.
Both layouts are designed to feel modern and premium, with smooth transitions that integrate seamlessly into any website design.
Step 4: Preview, copy, and go live
Before committing, you can preview the widget directly in the Lookio platform. Test it out, ask questions, see how the assistant responds and how the layout looks.
When you’re satisfied, click the “Copy script” button. You’ll get a lightweight six-line script like this:
<script
  src="https://widget.lookio.app/widget.js"
  data-widget-id="YOUR_WIDGET_ID"
  data-position="bottom-right"
  data-theme="light"
  defer>
</script>
Paste this into your website’s custom code section (or before the </body> tag). Save, publish, and your AI chatbot is live.
That’s it. Two minutes of configuration, six lines of code, and your visitors now have instant access to your entire knowledge base via a beautiful chat interface.
Monitor conversations and learn from your visitors
Once your widget is live, Lookio doesn’t just leave you guessing. You can:
- Access every conversation directly in the platform to see what visitors are asking.
- Monitor usage analytics to track volume, response quality, and engagement over time.
- Identify patterns in what your prospects and visitors are most curious about—unlocking real product and marketing insights.
This turns your chatbot from a support tool into a continuous feedback loop. The questions visitors ask are a goldmine for improving your product messaging, documentation, and sales strategy.
Why Lookio widgets stand out
| Feature | Lookio widgets | Mintlify AI | Building it yourself |
|---|---|---|---|
| Setup time | ~5 minutes | Only on Mintlify | Weeks to months |
| Pricing | From ~2¢/query, pay-as-you-go | Up to 50¢/message, fixed tiers | Server + API costs |
| Knowledge sources | PDFs, URLs, sitemaps, text | Docs pages only | Whatever you build |
| Where it works | Any website, app, or docs | Mintlify docs only | Wherever you deploy |
| Auto-sync knowledge | ✅ via sitemaps | ✅ (docs only) | You build it |
| Customizable design | Colors, fonts, 2 layouts | Limited | Full control (you build it) |
| Conversation analytics | ✅ built-in | ❌ | You build it |
Get started in 5 minutes
The bottom line: if your website doesn’t have an AI-powered chatbot yet, you’re leaving better user experience, stronger brand perception, and valuable visitor insights on the table.
With Lookio, deploying one is genuinely a five-minute job. No code to write, no RAG pipeline to debug, no servers to manage.
- Create a free Lookio account (100 credits included).
- Upload your docs, sync your sitemap, or paste your content.
- Create an assistant, configure a widget, and copy the script.
- Paste it on your website. You’re live.
Your visitors will thank you. And so will your sales team.